8.2.01
CP Create a New Family Record: ERSEA Team
The ERSEA team is usually responsible for creating new family records in ChildPlus. Social Service staff may need to enter a new family if the child changes family in the middle of the year and you cannot find this family in ChildPlus using the wl2012 (username/password) ChildPlus account.
Notes:
- Social Service Staff will only add the members of a new family (such as new foster parents), who do not already exist in ChildPlus, through this function. After all family members and their demographics have been entered and saved, the system will open the family record in the Application At this point you can locate family members who already exist in ChildPlus and add them to the new family as needed.
- Throughout these instructions, fields marked with an asterisk (*) require entry to comply with federal data-gathering requirements. In ChildPlus they are marked with the acronym “PIR,” which stands for Program Information Report. Usually the Family Worker or Home Visitor is responsible for maintaining the family’s PIR data.
Create the Initial Family Record
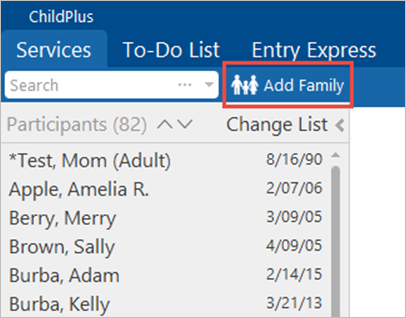
- Click the Add Family button above the Participants List.
When entering a new family record, begin by entering the information about the primary adult. This is the child’s primary guardian.
- In the Add New Family window, enter the following:
- In the Adult or Child field, select “Primary Adult.”
- In the Applicant field, select “Non-Applicant.”
Note: An exception to this is if you are creating a family record for a pregnant woman whose unborn baby will be enrolled in an Early Head Start or state program at birth. In this case, the mother would be considered an “Applicant.”
- The person’s First, Middle, and Last
- The primary adult’s Birthday and
- Update the primary adult’s English Proficiency as needed.
- Child’s Relationship to the primary adult, and whether he or she has Custody.
Note: The PIR data fields Race, Hispanic, Highest Grade and Employment are completed by the Family Worker or Home Visitor after a child is enrolled.
- In the Add a Family Member section, select the next family member to be added to the family record. Then complete the following

- Select whether the person is an Applicant.
- The person’s First, Middle, and Last
- Birthday and
- English Proficiency.
- Scroll down to the Add a Family Member section again, and add each family member to the family record.
- Complete the Family Information section for Address.
- Select the checkbox if the person’s Living address is the same as family’s.
- Living Address, City, State, Zip code, and County
- Select the checkbox Mailing address is the same as family’s.
- Deselect Mailing address is the same as the living if you need to enter a separate mailing address. (Do not deselect Mailing address is the same as family’s.)
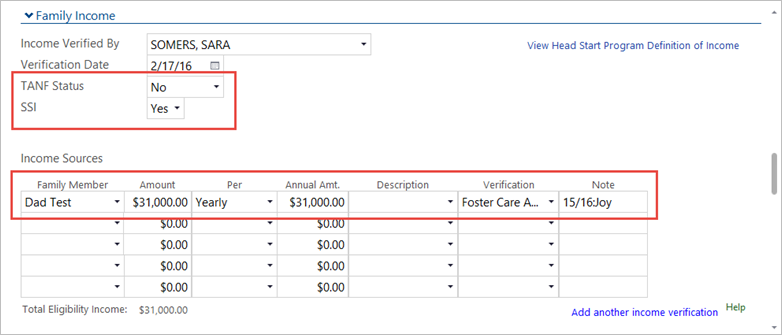
- Complete the Family Income section.
- Select whether the family has TANF Status and/or Supplemental Security Income. This information is located on the Pre-application – Public Assistance section, the Head Start Eligibility Verification (Income) form, or the Health Developmental Needs Assessment (HDNA).
- For each family member, select the Family Member from the drop-down list.
- Enter the Amount, Per, Annual Amount, and if applicable, of each source of income for the family. The total annual amount is located on the Excel Income Calculation Worksheet.
- Type any Income Notes as needed. Click the clock icon to include a time/date stamp and your User ID. All notes display in the field beneath the entry field.
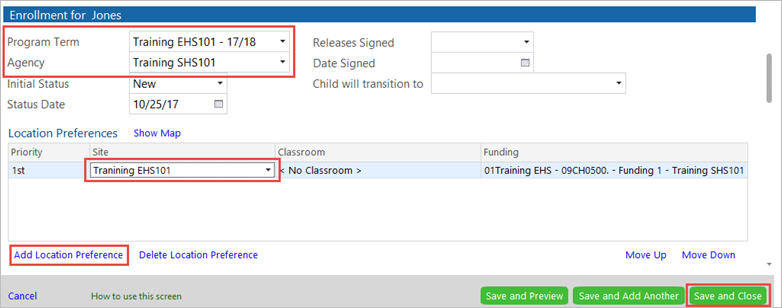
- Scroll down to the Enrollment for (family name) section, and complete the following fields for each applicant in the family:
- Select the Program Term and Agency.
- Select the Initial Status “Waitlisted.”
- Select the relevant Site and Classroom. Refer to the Excel Waitlist spreadsheet.
Note: You can select two location preferences. Click the Add Location Preference button to add a second location.
- Add Eligibility Criteria, Application Date, Eligibility Date, Number in Family and other verification information as necessary.

9. When you have finished, click the Save and Close