8.6.05
Attaching DLL Documents into CP
Attaching DLL Documents into ChildPlus
Scanning and Renaming DLL Documents
Create a folder in your My Documents that you will Save As or copy the scanned Family Demographics Form and Family Language & Culture Interview to (ex. To CP).
- Scan the Family Demographics Form and Family Language & Culture Interview as one scan, into your center _Scan folder.
- Open your center _Scan
- Find the document you scanned
- Copy the scanned document into the folder you created, you will attach the record into ChildPlus from this folder.
- Rename each document (ex. DLL_RCreek)
- Delete files from _Scan Folder
Attaching Files into CP
- Log into
- Select the child you are going to attach the DLL document
- Click on “Family Services”
- Click on “Attachment” tab
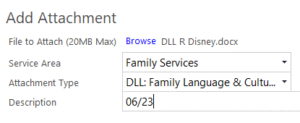
- Click on “Add Attachment”

- Navigate to the folder you put the scanned DLL documents in
- Select the correct DLL documents.
- Click “Open”
- Service Area: Ensure it reads Family Services
- Attachment Type: DLL: Family Language & Culture Interview
- Description: Type month and year the documents were filled out (ex. 9/2/20)
- Click Save

