8.1.2.6
Entering Opportunities for Growth, Neutral & Interests Identified in ChildPlus
- Select Child from my Participants
- Select Family Service Tab
- Select Add Event
- Select Resource/Referral from the drop down menu
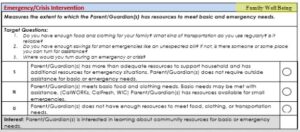
- Initial Date: Enter the date the opportunity for growth, or interest was identified (It is usually the date the Family Opportunity and Interest Assessment (FOIA) was completed)
- Description: Enter a brief description of the identified opportunity for growth, or interest (i.e., family would like food resources)
- Service Area: Select the Parent, Family, & Community Engagement (PFCE) Outcome (link to PFCE Framework) associated with the identified opportunity, neutral category, or interest. The PFCE Outcomes all begin with RR: (You can find the outcome located on the right side of each FOIA question header)

- Issue: Select the FOIA category/question from the dropdown menu associated with this Opportunity for Growth or Interest Identified
- Case Worker: Enter the Family Services staff name
- Family Members: Enter the name of the family members involved.
- Closure Expected: Enter the expected date the Resource/Referral and Follow Up process will be complete (See SOP 5.5.4.1 – Resource Offered)
- Date Closed: Leave Blank

Completing this step will ensure that follow up reminders will appear on your To Do List
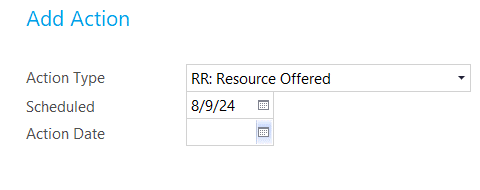
- Click “Add Action”
- Action Type: RR: Resource Offered
- Scheduled: Enter the scheduled date of when you plan to provide the family with a Referral/Resource (Should match the Closure Expected date from the “Event” Closure Expected box
- Leave all other boxes empty at this time.
- Click Save
18. Click Save again